You are currently viewing Dr. Chrono API Integration With Salesforce™

Dr. Chrono API Integration With Salesforce™

Sharing is caring!

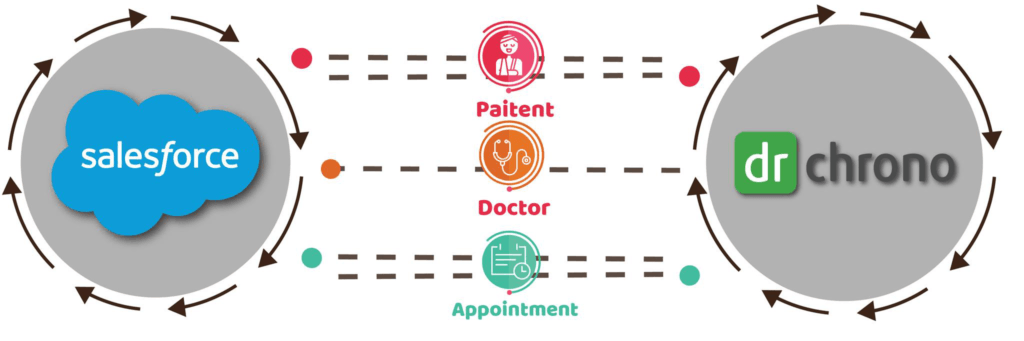
I have worked on many API integrations of Salesforce to other 3rd parties and here I will be sharing my coding experience with Salesforce to Dr. Chrono API integration. One my end clients requested this plugin/ app to be created in Salesforce which will do the Doctors, Patients and other information syncs between the two platforms.

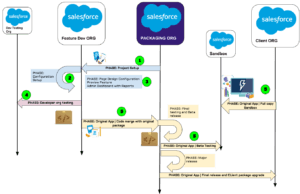
Below image shows “integration mind mapping” used by me. I use it to consider some major aspects while discussing integration approaches for this project. 

In this post, we will discuss how Dr. Chrono API can be used to integrate with Salesforce™. But before moving forward let’s discuss the requirement of the project.
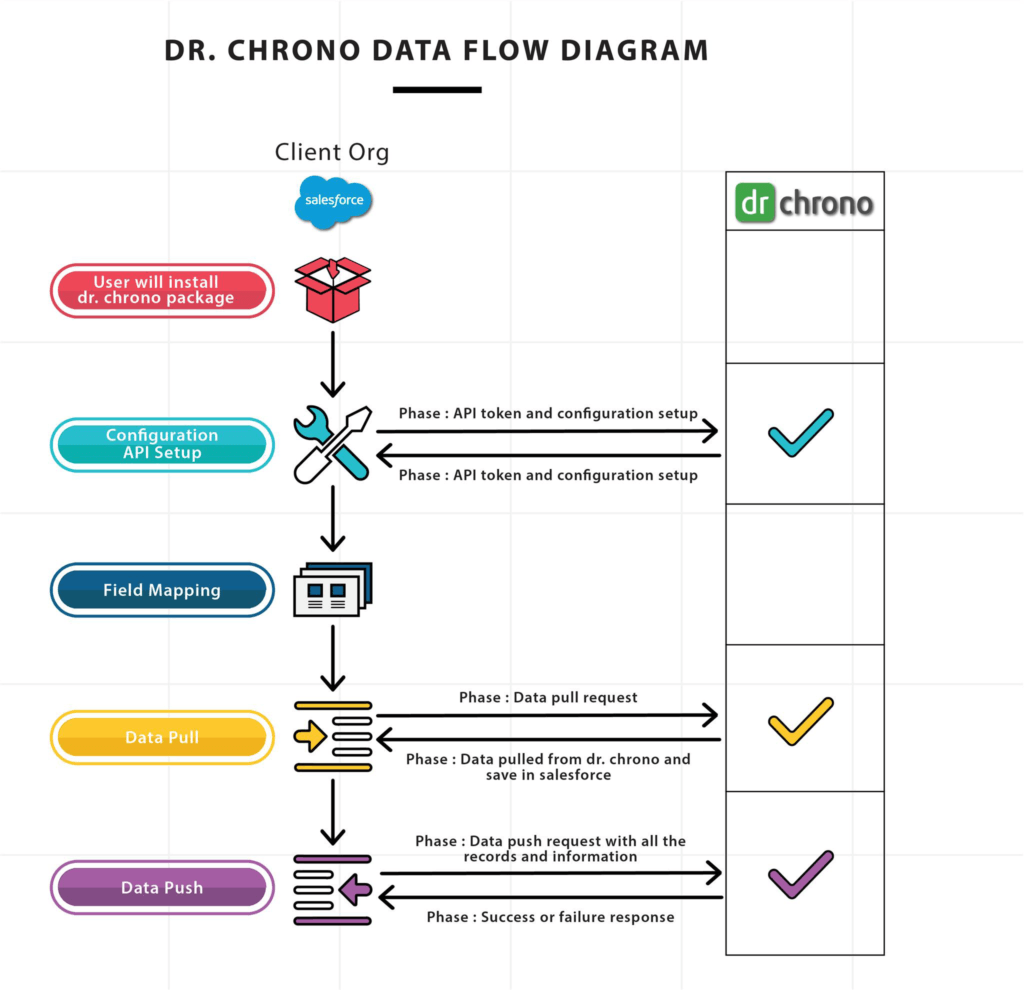
Data flow diagram :

App development strategy:

The project requirements encurtail following. We have to integrate the Dr. Chrono API with Salesforce™ and create a plugin exclusively, it is a free Healthcare API and SDK built by developers, for developers. Leverage health data, an EHR, practice management and medical billing platform, beside it Dr. Chrono gets 22 Million API calls per month.

What is Dr. Chrono API? 

A company that helps people find quality care providers nearby, is using the Dr.Chrono API to integrate patient records into the service. This vastly improves the search experience, as patients are connected with doctors based on their medical history and set of conditions. There API uses a common web-based authentication system. It provides a straightforward way for a provider to grant access to their data to your application.

There are three main steps in the OAuth 2.0 authentication workflow.

  1. Redirect the provider to the authorization page.
  2. The provider authorizes your application and is redirected back to your web application.

Your application exchanges the authorization_code that came with the redirect into a pair of access_token and refresh_token

Step 1: Redirect to Dr. Chrono

The first step is redirecting your user to Dr. Chrono, typically with a button labeled “Connect to Dr. Chrono” or “Login with Dr. Chrono”.

Step 2: Token exchange

Below code is used to obtain a pair of the access token and refresh token like this:

           return customsetting;

Code Snippet

import datetime, pytz, requests

if ‘error’ in get_params:
   raise ValueError(‘Error authorizing application: %s’ % get_params[error])

response = requests.post(‘https://drchrono.com/o/token/’, data={
   ‘code’: get_params[‘code’],
   ‘grant_type’: ‘authorization_code’,
   ‘redirect_uri’: ‘REDIRECT_URI’,
   ‘Dr.Chrono_id’: ‘Dr.Chrono_ID’,
   ‘Dr.Chrono_secret’: ‘Dr.Chrono_SECRET’,
})
response.raise_for_status()
data = response.json()

# Save these in your database associated with the user
access_token = data[‘access_token’]
refresh_token = data[‘refresh_token’]
expires_timestamp = datetime.datetime.now(pytz.utc) + datetime.timedelta(seconds=data[‘expires_in’]) 

Roadblock (1): Refreshing an access token

Access tokens only last 10 hours (given in seconds in the ‘expires_in’ key in the token exchange step above), so they occasionally need to be refreshed.


response = requests.post(‘https://drchrono.com/o/token/’, data={
   ‘refresh_token’: get_refresh_token(),
   ‘grant_type’: ‘refresh_token’,
   ‘Dr.Chrono_id’: ‘Dr.Chrono_ID’,
   ‘Dr.Chrono_secret’: ‘Dr.Chrono_SECRET’,
})

response.raise_for_status()
data = response.json()

# Save these in your database associated with the user
access_token = data[‘access_token’]
refresh_token = data[‘refresh_token’]
expires_timestamp = datetime.datetime.now(pytz.utc) + datetime.timedelta(seconds=data[‘expires_in’])

Roadblock (1): Refreshing an access token

Access tokens only last 10 hours (given in seconds in the ‘expires_in’ key in the token exchange step above), so they occasionally need to be refreshed.


response = requests.post(‘https://drchrono.com/o/token/’, data={
   ‘refresh_token’: get_refresh_token(),
   ‘grant_type’: ‘refresh_token’,
   ‘Dr.Chrono_id’: ‘Dr.Chrono_ID’,
   ‘Dr.Chrono_secret’: ‘Dr.Chrono_SECRET’,
})

Main API Usage

Getting user information
In cases where Dr.Chrono is used for single sign-on, often the first request that’s made is to /api/users/current to get information about the currently logged in user:
Code Snippet

import requests

response = requests.get(‘https://drchrono.com/api/users/current’, headers={
   ‘Authorization’: ‘Bearer %s’ % access_token,
})
response.raise_for_status()
data = response.json()

# You can store this in your database along with the tokens
username = data[‘username’]

This is what we used to integrate it in Salesforce™. The next step which we require is to push the data from both sides or simply we can say a two-way integration between Salesforce™ and Dr.Chrono.

So basically we did is a two-way synchronization of Patient and Appointment but for Doctor’s list, we can only sync it from their end. For synchronization, we are using an external Id for each object and on the bases of this external Id we were doing Upsert and insert from both side. For Salesforce™ it is working as an external Id but at their end, it was treated as Id which helps us a lot in reducing the duplicity of records.

Connectivity of Dr.Chrono API with Salesforce™ :

HttpRequest req = new HttpRequest();

               HttpResponse res = new HttpResponse();

               Http http = new Http();

               String Endpoint = ‘/o/token/’;

               req.setEndpoint(BaseUrl + Endpoint);

               req.setMethod(‘POST’);

               req.setHeader(‘Content-Type’, ‘application/x-www-form-urlencoded’);

               String BodyString = ‘grant_type=refresh_token&Dr.Chrono_id=’+customsetting.chrono__Dr.Chrono_Id__c+’&refresh_token=’+customsetting.chrono__Refresh_Access_Token__c+’&Dr.Chrono_secret=’+customsetting.chrono__Dr.Chrono_Secret__c;

               req.setBody(BodyString);

               req.setTimeOut(120000);

               system.debug(‘>>>>>Request –>’+req.getBody());

               res = http.send(req);

               system.debug(‘>>>>>Status Code –>’+res.getStatusCode());

               if(res.getStatusCode() != NULL && res.getStatusCode() == 200 && res.getBody() != NULL){

                   System.debug(‘–>>RESPONSE in RefreshAccessToken –> ‘+res.getBody());

                   JSONParser parser = JSON.createParser(res.getBody());

                   while(parser.nextToken() != null) {

                       if(parser.getCurrentToken() == JSONToken.FIELD_NAME && parser.getText() == ‘access_token’) {

                           parser.nextToken();

                           accessToken = parser.getText();

                           customsetting.chrono__Access_Token__c = accessToken;

                       }

                       else if(parser.getCurrentToken() == JSONToken.FIELD_NAME && parser.getText() == ‘refresh_token’) {

parser.nextToken();

customsetting.chrono__Refresh_Access_Token__c = parser.getText();

                       }

                       else if(parser.getCurrentToken() == JSONToken.FIELD_NAME && parser.getText() == ‘expires_in’) {

                           parser.nextToken();

    try{

                               Integer secondsValue = parser.getIntegervalue() – 3600;

                               customsetting.chrono__Token_Expires_On__c = DateTime.now().addSeconds(secondsValue);

                           } catch (Exception e){

                               system.debug(‘ERROR Message –> ‘+e.getMessage() +’ on –> ‘+e.getLineNumber() + ‘ In Class Dr.ChronoApi_CA ‘);

Image showing attachment Upload complete

Roadblock (2): DML and Callout

DML: DML provides a straightforward way to manage records by providing simple statements to insert, update, merge, delete, and restore records. Because Apex is a data-focused language and is saved on the Lightning Platform, it has direct access to your data in Salesforce™.

Callout: An Apex callout lets you tightly integrate Apex code with an external service by making a call to an external Web service or sending an HTTP request from Apex code and then receiving the response. Apex provides integration with Web services that utilize SOAP and WSDL, or HTTP services (RESTful services).

As discussed above they were using an OAuth tool(2.0 version) which generates a fresh token and after every 1 hour it gets expire, so it was a big question for us that how can we stop token to get expire?

Code Snippet

if(accessAndrefreshTokenMap.size() > 0){

           for(String accessToken : accessAndrefreshTokenMap.keySet()){

               if(accessToken != ” && accessAndrefreshTokenMap.get(accessToken)!= NULL && accessAndrefreshTokenMap.get(accessToken)!= ”){

                   customsetting.chrono__Access_Token__c = accessToken;

                   customsetting.chrono__Refresh_Access_Token__c = accessAndrefreshTokenMap.get(accessToken);

               }

           }

           Database.saveResult UpdateResult = Database.update(customsetting, false);

           if(UpdateResult.isSuccess()){

               Message = ‘Congratulations ! Token is saved successfully.’;

           }

           else {

               Message = UpdateResult.getErrors()[0].getMessage();

           }

       }

       else {

           Message = ‘Opps! An error had occurred. Please try again by clicking \’Authenticate\’ Button.’;

So after a discussion, we finally come up with a solution. Now what we did is every time for their custom setting we tried to check whether the token is expired or not and if we find the token is of before time then it is expired. That’s why instead of doing callout DML callout, we did call out and without inserting it into the custom setting we again did callout and then DML. Using callout DML approach we resolved this problem.

Dynamicly Shows The Patients List

Code Snippet

public chrono__DrChrono_Setting__c RefreshAccessToken () {

       try {

           String accessToken = ”;

           if( customsetting != NULL && customsetting.chrono__Refresh_Access_Token__c != NULL &&

               customsetting.chrono__Dr.Chrono_Id__c != NULL && customsetting.chrono__Dr.Chrono_Secret__c != NULL

           ){

               HttpRequest req = new HttpRequest();

               HttpResponse res = new HttpResponse();

               Http http = new Http();

               String Endpoint = ‘/o/token/’;

               req.setEndpoint(BaseUrl + Endpoint);

               req.setMethod(‘POST’);

               req.setHeader(‘Content-Type’, ‘application/x-www-form-urlencoded’);

               String BodyString = ‘grant_type=refresh_token&Dr.Chrono_id=’+customsetting.chrono__Dr.Chrono_Id__c+’&refresh_token=’+customsetting.chrono__Refresh_Access_Token__c+’&Dr.Chrono_secret=’+customsetting.chrono__Dr.Chrono_Secret__c;

               req.setBody(BodyString);

               req.setTimeOut(120000);

               system.debug(‘>>>>>Request –>’+req.getBody());

               res = http.send(req);

               system.debug(‘>>>>>Status Code –>’+res.getStatusCode());

               if(res.getStatusCode() != NULL && res.getStatusCode() == 200 && res.getBody() != NULL){

                   System.debug(‘–>>RESPONSE in RefreshAccessToken –> ‘+res.getBody());

                   JSONParser parser = JSON.createParser(res.getBody());

                   while(parser.nextToken() != null) {

                       if(parser.getCurrentToken() == JSONToken.FIELD_NAME && parser.getText() == ‘access_token’) {

                           parser.nextToken();

                           accessToken = parser.getText();

                           customsetting.chrono__Access_Token__c = accessToken;

                       }

                       else if(parser.getCurrentToken() == JSONToken.FIELD_NAME && parser.getText() == ‘refresh_token’) {

                           parser.nextToken();

                           customsetting.chrono__Refresh_Access_Token__c = parser.getText();

                       }

                       else if(parser.getCurrentToken() == JSONToken.FIELD_NAME && parser.getText() == ‘expires_in’) {

                           parser.nextToken();

      try{

                               Integer secondsValue = parser.getIntegervalue() – 3600;

                               customsetting.chrono__Token_Expires_On__c = DateTime.now().addSeconds(secondsValue);

                           } catch (Exception e){

                               system.debug(‘ERROR Message –> ‘+e.getMessage() +’ on –> ‘+e.getLineNumber() + ‘ In Class drchronoApiUtil_CA ‘);

                           }

                       }

                   }

               }

           }

           return customsetting;

ajay

Ajay Dubedi

CEO | Founder
Ajay Dubedi, the founder and CEO of Cloud Analogy, is a prominent Salesforce Sales, Service, and Marketing cloud Consultant with a rich expertise in handling challenging business models. Ajay has assisted and implemented solutions in industries comprising Banking, Health Care, Networking, Education, Telecommunication and Manufacturing. Ajay is globally acclaimed for his extensive experience in APEX Programming, VisualForce pages, Triggers, Workflows, Page Layouts, Roles, Profiles, Reports & Dashboards.

Hire the best Salesforce Implementation Partner. Choose Cloud Analogy, the world's most preferred Salesforce Implementation Company that provides custom CRM Implementation services.

Leave a Reply

× How can I help you?